Wednesday, August 29, 2018

Mexican Cornbread, Please

Mexican Cornbread
Since discovering how to grind my own cornmeal from popcorn, I’ve wanted to try my hand at Mexican Cornbread from some of my freshly ground cornmeal.  I purchased a 14-cup Cuisinart Food Processor a couple of years ago and I’ve had it just sitting on my counter top, unused.  I’ve looked at it several times and actually wondered why I purchased a machine so complex and intimidating rather than one that is simple enough to just plug in and process.  The recipe calls for grated cheddar cheese and I decided that I wanted to try-out this food processor to grate the cheese.  I was totally blown away with the ease in which it grated that cheese.  No longer intimidated, I’m looking forward to using it again real soon.  I think I may try making a batch of cookies real soon using the dough blade.


Mexican Cornbread

    • 1 1/2 cups all-purpose flour
    • 1 1/2 cups cornmeal
    • 1 tsp salt
    • 4 tsp baking powder
    • 1 Tbsp granulated sugar
    • 4 eggs
    • 1/2 cup vegetable oil
    • 1 15-oz can cream style corn
    • 1/2 cup chopped jalapeño peppers
    • 1 cup shredded cheddar cheese
  1. Grind the popcorn to make enough cornmeal to equal 1 1/2 cups
  2. Grate the cheese in the food processor (to equal 1 cup ... a little over will not hurt)
  3. Chop the jalapeño peppers (either fresh or canned)
  4. Combine dry ingredients together in medium mixing bowl
  5. Add eggs, vegetable oil, and corn and mix well
  6. Fold in jalapeño peppers and cheese
  7. Spoon into hot prepared pans
  8. Bake at 350 F 30 minutes or until done.


Thursday, August 23, 2018

Sarah's Fried Sweet Potatoes

My Sister Sarah
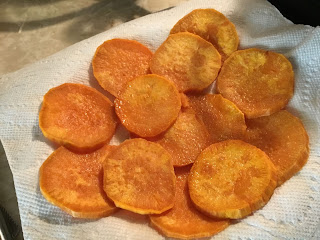
I talked with my sister Sarah this morning (she is our family's Amazing Grace) and she fried some sweet potatoes for our mother's breakfast.  I remember eating this amazing dish as a child ... one of the many wonderful delicious things our Mother cooked for us.  I don't know why I've not continued this tradition but my sister has.  I asked her how she prepared hers and the recipe she gave me is surprisingly simple.  Sarah says:

"I just peel them, slice them up, and cook them covered on medium heat, take them out and sprinkle with salt...".  Sarah says a dear, departed, friend of hers, Patsy, sprinkled hers with sugar.

Looking forward to cooking these so, here's a picture of hers on the left.  They look so yummy.


Note;  Sarah says she does turn them over while cooking them.  If you wait until the bottom of the potatoes are browned, you’ve probably cooked them too long and they will be hard.  Use your judgment.  She saves her leftover grease from frying her potatoes in a cannng jar.


Wednesday, August 22, 2018

My Favorite Red Velvet Cake

I purchased a cookbook back in the early 1970s from one of my co-workers and in it was a recipe for a Red Velvet Cake.  I baked one and it quickly became one of the favorite cakes in our household for Thanksgiving and Christmas holidays.

I purchased a new cookbook at BJ's yesterday and in it was another version of Red Velvet Cake.  Although the recipe below is my current favorite, I plan to check out the recipe in my new cookbook.  I've seen plenty of Red Velvet cake recipes but they normally call for shortening or vegetable oil.  The thing I love about my current recipe is that it calls for the use of butter, as does the recipe in my new cookbook.  There are a few differences between the two recipes, more or less of some ingredients.  I plan to bake one of each during the upcoming holiday season to determine if there are visual and taste differences.

My Favorite Red Velvet Cake (Currently)

    • 1/2 cup butter
    • 1 1/2 cups sugar
    • 1 tsp vanilla
    • 2 eggs
    • 2 heaping tbsps cocoa powder
    • 1 1/2 oz red food color
    • 2 1/2 cups all-purpose flour
    • 1 tsp salt
    • 1 cup buttermilk
    • 1 tsp baking soda
    • 1 Tbsp white vinegar
  1. Preheat oven to 350 F
  2. Grease cake pans & line with parchment paper.  Flour pans.
  3. Cream butter, sugar, and vanilla together.  Add eggs, one at a time.
  4. Make a thin paste of cocoa powder and red food color.  Add to creamed mixture.
  5. Sift flour and salt together and add alternately with buttermilk, 1 tablespoon at a time, beginning and ending with flour.
  6. Mix baking soda and vinegar together and blend into batter.
  7. Bake at 350F 20-30 minutes (depending on oven temperature)
  8. Frost with Cream Cheese Frosting.
Here's the recipe for the Red Velvet Cake in my new cookbook.  

Red Velvet Cake Inspired by California Pizza Kitchen

    • 2 cups all-purpose flour
    • 2 tablespoons unsweetened cocoa powder
    • 1 teaspoon salt
    • 1 1/4 cups buttermilk
    • 1 bottle (1 ounce) red food coloring
    • 1 teaspoon vanilla
    • 1 1/2 cups sugar
    • 1 cup (2 sticks) butter, softened
    • 2 eggs
    • 1 tablespoon white or cider vinegar
    • 1 1/2 teaspoons baking soda
  1. Preheat oven to 350F.  Spray three 9-inch round  cake pans with nonstick cooking spray.  Line bottoms of pans with parchment paper; spray with cooking spray.
  2. For cake, combine flour, cocoa, and salt in medium bowl, mix well.  Combine buttermilk, food coloring and 1 teaspoon vanilla in small bowl; mix well.
  3. Beat granulated sugar and 1 cup butter in large bowl with electric mixer at medium speed 5 minutes or until light and fluffy.  Add eggs, one at a time, beating until well blended after each edition.  Add flour mixture alternately with buttermilk mixture, beating at low speed after each addition.  Stir vinegar into baking sodden small bowl.  Add to batter; stir gently until blended.  Pour batter into prepared pans.
  4. Bake about 20 minutes or until toothpick inserted into centers comes out clean.  Cool in pans 10 minutes.  Invert onto wire racks; peel off parchment and cool completely.

Frosting

    • 2 packages (8 ounces each) team cheese, softened
    • 1/2 cup (1 stick) butter, softened
    • 6 cups powdered sugar
    • 14 cup milk
    • 2 teaspoons vanilla
    • 4 ounces white chocolate, shaved with vegetable peeler
  1. For frosting, beat cream cheese and 1/2 cup butter in large bowl with electric mixer at medium speed until creamy.  Add powdered sugar, milk, and 2 teaspoons vanilla; beat at low speed until blended.  Beat at medium speed until smooth.
  2. Place o ne cake layer on serving plate.  Top with 1 1/2 cups frosting; speed evenly.  Top with second cake layer; spread with 1 1/2 cups frosting.  Top with remaining cake layer; spread remaining frosting over top and side of cake.  Press white chocolate shavings into side of cake.

Monday, August 20, 2018

Old-School Cornbread

I don't particularly care for cornbread made from self-rising or Jiffy cornbread mix.  I started making my cornbread using plain yellow cornmeal a few years back but it has become increasingly difficult to find the plain yellow cornmeal in stores.  On the occasions when I do find it, it is usually the 2-pound bag of white cornmeal.  I always buy the 5-pound bag because I cook it quite often because hubby and I usually have some with our dinner, especially with fresh vegetables (collard greens, turnip greens, green beans, rutabagas, peas, beans, etc.).

I was told at one of the stores that they had started removing the plain cornmeal from the shelves because there is no longer a great demand for it.  I was crushed!!! What about those of us who still use it???

Later I remembered that when I was a child, my parents would take dried corn to the mill to be ground into cornmeal so I decided to go to YouTube for directions on making my own cornmeal.  Pay dirt!!! YouTube ROCKS!!! You can find instructions/directions for almost everything  there.  After my YouTube search, I found that all I needed to make my own cornmeal was un-popped popcorn and my blender to grind it.  I ground my first batch of cornmeal, baked some cornbread muffins and they turned out perfect!!!  Here is  my recipe:

Cornbread

1 large scoop of cornmeal from ground popcorn (approximately 1 1/2 cups)
1 large scoop of all-purpose flour (approximately 1 1/2 cups)
3 tsp baking powder
1 tsp salt
1 tbsp sugar
1 stick softened or melted butter
2 eggs
1 to 1 1/2 cups whole milk

  1. Preheat oven to 450 F.  Grease pans.
  2. Grind the corn in a blender or food processor, then sift using a strainer (I grind 2 cups of popcorn in order to yield enough for me).  After sifting cornmeal into your bowl, the residuals left in your strainer can be discarded. 
  3. Whisk together flour, baking powder, salt, and sugar until thoroughly blended.
  4. Add milk, eggs, and butter and stir or whisk until thoroughly mixed together.
  5. Pour batter into greased pan or muffin tins
  6. Bake until done (10-12 minutes in my cast iron muffin pans)
Note:  Add 1/2 tsp baking soda with the dry ingredient if using buttermilk


Sunday, August 12, 2018

Peach Preserves


Peaches were delicious this year and Wayfield Grocery Store had them on sale for .69 per pound.  A great buy because the local farmer's market didn't have them priced that low.  I bought several pounds and made Peach Preserves.  I don't know how many pounds I ended up with but here is how I made my preserves.  I had read an article some years ago on how to can peach preserves and I don't remember the name or author of the website but here is what I remembered and the way I made my Peach Preserves.

Ingredients:  Peaches and Sugar

I placed my peaches in a large vat of water and let them sit in the water for a while before peeling them.  Some people use the boiling water method to peel peaches but my preferred method is using the tool that I use to peel my potatoes.

After peeling the peaches, I cut them into slices. I then take a small paring knife and cut out the dark area where the peach pit was because this is a bitter area and sometimes contain bits of the peach pits. I use a large plastic bucket and layer peaches and sugar into it and let the peaches and sugar sit, stirring occasionally, until the sugar is melted.  Can be left overnight, if desired.

I've got a large pressure cooker and I place the peaches with the juice into the pressure cooker but I do not pressure cook the peaches.  Bring them to a boil, stirring constantly, and cook over medium heat for 10 minutes.  Let cool.  Repeat this process four times or until the juice has thickened into syrup.

Skim off any foam that has accumulated on the peaches and spoon into sterilized jars.  Clean the rims of the jar with a clean towel, place the lids on the jars, screw the rims on but do not tighten them.  Place jars into canner that has hot water in it.  If water in canner does not cover tops of jars, add more water to cover jars by at least two inches.
Cover canner and bring to a boil and let boil for 25 minutes.  Remove jars from canner and set on towel on counter top.  Lids should pop/seal after removal from canner.  Next day, check jars to make sure all lids have sealed.  If rims are loose, screw to secure but do not screw tight.